

How To Open Amcrest Camera Stream In Vlc
I have been using Amcrest cameras and a NV4116E NVR for some time now. Since my main office workstation is Linux I never had a convenient way to view my cameras. During this short article we will explain how to setup VLC to view your Amcrest photographic camera stream using RTSP (Real Time Streaming Protocol). I am using Fedora, but this should work on any Linux organisation running Gnome since VLC has such broad Os support.
NOTE: This volition only work locally (Computer and camera on same network) unless you want to open ports on your router / firewall. I advice against that so we will not be roofing that in this article.
What y'all volition need
- VLC installed on your organisation
- Username & Password for or IP Camera
- IP Address for NVR or Camera
Install VLC on CentOS, Red Hat or Fedora
Run a unproblematic yum command to install vlc and it'due south dependancies.
sudo yum -y install vlc
Install VLC on Ubuntu or Debian
sudo apt-go update; sudo apt-become install vlc
Setting up Amcrest Device
Configuring a not-privileged user
I recommend creating a new user with view simply access to the Amcrest device since the password will exist stored in obviously text on your estimator.
Log into your Amcrest camera, click the gear on the acme of the page and navigate to Settings > Account > Add together New to complete this step.
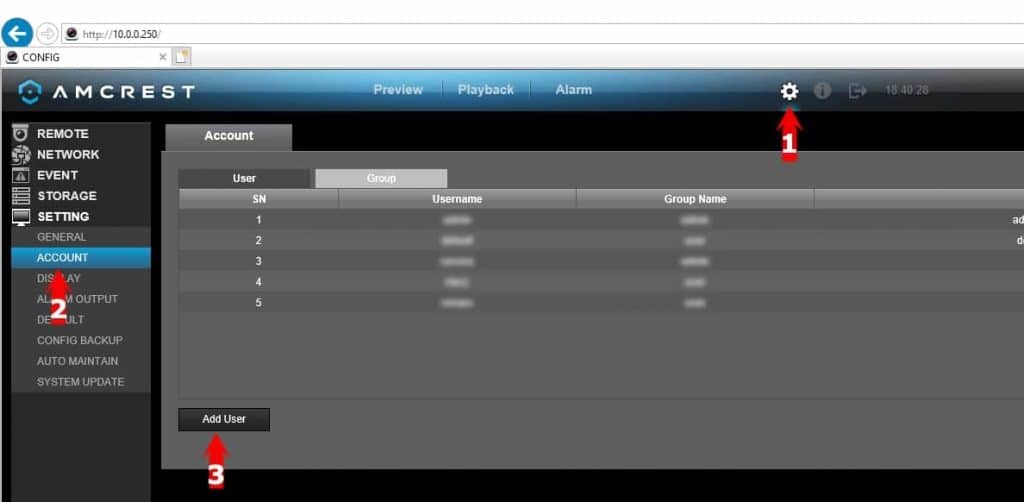
For this example let's assume the username is "vlc" and the password is "L3tm3S33".
If you utilise any special characters in your password, y'all will have to ensure to escape those. You lot tin learn more than about escaping special characters here.
Finding the RTSP Port
Log into your Amcrest NVR or Photographic camera, click the gear on the pinnacle of the folio and navigate to Network > Connection.
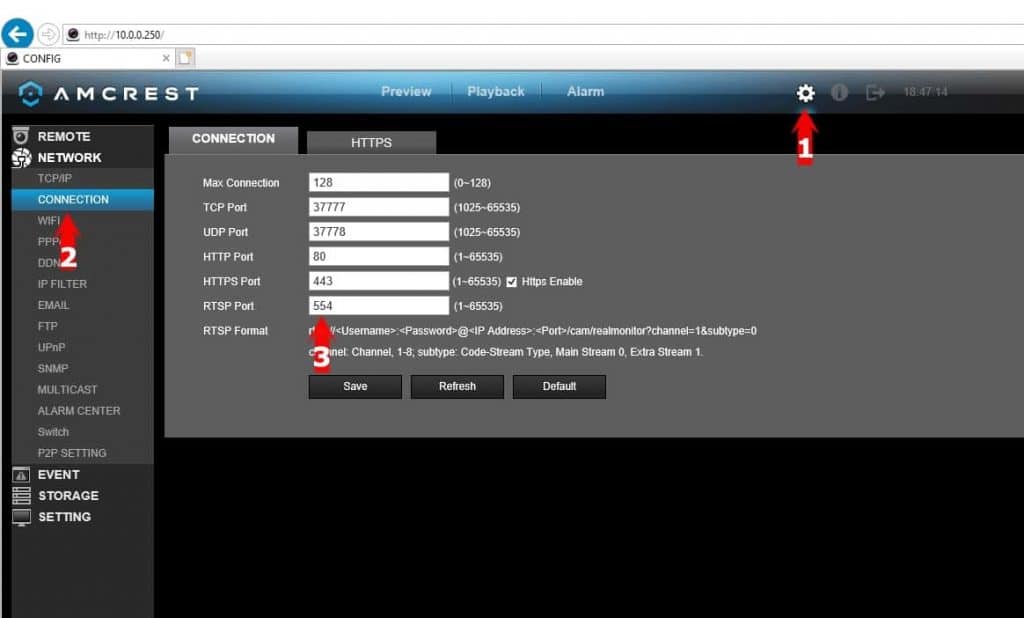
Take notation of the RTSP port. Under information technology you lot will besides see the RTSP format which is needed to connect to it via VLC.
Creating the Desktop Entry
In order to make an application and put it into the desktop menus, we have to create a special file called a desktop entry. Information technology is basically a text file with the ".desktop" extension. This file contains all the configurations for your application.
To create the desktop entry, open up your favorite text editor and create a file in ~/.local/share/applications with the following lines.
[Desktop Entry]
Version=1.0
Name=FrontCAM
Exec=vlc rtsp://vlc:[electronic mail protected]:554
Concluding=fake
Type=Application
StartupNotify=true
Categories=Development
X-Desktop-File-Install-Version=0.xv
Icon=/usr/share/icons/Custom/Sec1.png
The "Exec" line above tells the organization to open VLC and connect to the RTSP stream. In the to a higher place case we are connecting to channel one, which is the default. Considering we are connecting to the default channel we do not accept to specify information technology. If we wanted to connect to a unlike aqueduct nosotros would edit the control to read like this.
Exec=vlc rtsp://vlc:[email protected]:554/cam/realmonitor?channel=2?subtype=0
The subtype tells VLC which stream to open, 0 for primary and 1 for substream. The substream is typically a lower quality.
We now created a new application in my awarding list. If you find the icon line, you will see that I used a custom icon, you can use whatever you similar. I will include my icons at the bottom of this post. I created five security camera icons because I have five channels on my NVR.
Next I searched for the FrontCAM application past hitting the Super Key (Windows Key) and typing front. I right clicked on it and added information technology to my favorites. I repeated the above steps for all five of my cameras, at present I can quickly go to all 5 streams from my NVR on my Linux workstation.
To find the URL of your camera or device, check out the link below.
Connect to Amcrest IP Camera URL
Here are the icons I used, feel free to have them.


Source: https://www.putorius.net/amcrest-camera-in-linux-using-vlc-and.html
Posted by: petersonhypect1953.blogspot.com
0 Response to "How To Open Amcrest Camera Stream In Vlc"
Post a Comment